Showing posts with label DIY. Show all posts

Tuesday, September 27, 2011

Tutorial Tuesday & Linky Party - DIY Maxi Dress

Good morning, bloggers! I have a really awesome tutorial to share with you today. I know you're going to be shocked, but it's not something baby-related! It's a full grown sewing project, it's super fast, WAY cheap, and easy enough for anyone to do.

The DIY Maxi Dress


Now, I don't know about you guys but I have had the hardest time letting of my maternity tank tops. I love them. For me, it's comfort and coverage. Being rather, how should I say this... "top heavy" I have always struggled to find tops that can accommodate the load, lol, and offer me some decent coverage without showing my bra straps. Until I got pregnant, I just assumed I would never find this magic tank. Then came the world of maternity clothing. I can't really wear any of it anymore as it all looks funny, but I just couldn't let go of the tanks. So I decided to modify! :)

What makes this project so easy is the fact that you're using an already constructed shirt. No arm holes to sew, no serious measurements, and no trying to pin while wearing. Nice. :)

Materials List
  1. Tank top or t-shirt that fits you well. 
  2. 1 full yard (at least) of coordinating fabric. I used a jersey knit so it's stretchy and forgiving. ;)
    • A note on the skirt fabric: I used an entire yard because I planned to ruffle it to give the dress some fullness and movement, and not have it be too fitted. You can use more or less as you like, and as measurements allow. 
  3. Coordinating thread. Though it can really be any color because it doesn't show.
  4. The usual suspects: sewing machine, scissors, measuring tape
Here we go... Photos reflect instructions from left to right and top to bottom.


Tutorial Instructions:
  1. Choose your shirt and fabric.
  2. Try on your shirt and make a mark where you want your skirt to start. Then draw a guide line across the shirt and cut through, removing the bottom half.
  3. Since we're using the entire yard, fold the long sides of your fabric together and hem together to make a giant tube. I used a regular running stitch twice, and then serged the ends together for extra sturdiness. You can also use a zig-zag stitch in place of serging.
  4. Next, decide which end of the tube will be your at your waist, and sew a single line all the way around, being careful not to overlap at the seam. Pull the ends of the thread to ruffle until it fits your waist measurement.
  5. Now, turn your tube inside out (if it's not already), and put your tank inside the tube with the right sides facing each other and the open ends matched up. Pin together securely.
  6. Sew together the tank and fabric tube. You can probably use just about any stitch for this, but I used my #9 which is like a slanted zig-zag stitch. This stitch will give you a little stretch, which is good when dealing with knits and jersey fabric.
  7. You can see the finished #9 hem in box #7. Now trim your threads, and any errant fabric.
  8. Turn right side out and inspect your hems.
  9. You can hang and measure for a bottom hem, but it's not necessary. I didn't because for one, jersey doesn't fray so it doesn't need a hem, and secondly, I have such long legs that my whole yard was just about the right length to hit my toes. When it comes to dresses, I like 'em long and swishy!
And that's it! You're finished! How easy was that? Now have fun dressing it up, or wearing it plain... there's nothing this fun maxi dress can't do. 

Now it's your turn! Link up your projects below for this week's linky party!

Linky Guidelines:
  1. Please feel free to link up as many projects as you would like!
  2. Please link directly to your project post, it makes them much easier for everyone to find.
  3. Please no etsy shops, or generic blog links. Specific posts links only.
  4. Visit someone else's link and share the bloggy love!
  5. Grab yourself a button and post it in your project post or on your blog. Optional of course, but the more we share the party, the more people see your posts! :)
  6. Have fun!!
Have a great week!!

XOXO


Wednesday, August 31, 2011

What I Pinned {Wednesday}

Hi all! I hope you're having a great week so far, it's hump-day so at least we know we're halfway to the weekend! For this week's edition of "What I Pinned {Wednesday}" I'm sharing some pins from my "Green Living" board.

Like me, I know many of you out there are always looking for ways to leave less of a mark on the earth, live more self-sustained lifestyle, and maybe save some $$ along the way. Hopefully some of these links are helpful, and as an added bonus I've added a litte linky party below where you can add any "green living" tips or links that you would like to share with me!

If you link up some of your own tips and tricks for green living, I'll catalog them and put them all together for a very special "Green Living" series coming this Fall!

Here's what I have to share this week. If you'll notice, all these links are conveniently laid out like a road map to a successful, natural garden! (click the photos for pinterest-provided links):


DIY Winter Greenhouse for about $50
{great for leafy greens, and keeping a stock of fresh veggies through the winter!}

DIY Rain Collection Barrels
{because when you're in the middle of a huge drought, regular water just doesn't cut it}


35 DIY Pest, Disease and Weed Remedies
{to keep those plants and veggies bug-free, disease-free, and healthy!}


Web Resource for How to Can ANYTHING!
{so you'll get the most out of your garden or grocery trip}


Home made substitutes for your grocery store staples.
{because less time in the grocery store is always a plus... at least for this Momma!}


Kitchen Countertop Compost Collector
{no more stinky mess, and no more trips out to the compost bin after dark when it's 40 degrees out!}


And even though it has nothing to do with your garden, this is one of my favorites:

A Comprehensive List of DIY cleaners and solutions for your home!
{because don't you feel better knowing what your family is being exposed to? I do.}


Feel free to link up any of your "Green Living" 
projects, ideas, recipes, or links below!

PLEASE, no unrelated posts, they'll just get deleted anyway. ;)


***Need an invite to Pinterest? Leave me a comment with your email and I'll send you one!***


XOXO

Saturday, April 9, 2011

Linky Party Features!!

Yay for the weekend! I don't know about you guys, but I like to lay in bed in the morning and read blogs. I do it every day before the sun is even up. {or more importantly, before the baby is up!} There are just never very many on Saturday & Sunday and I'm always sad about that. So here we are! Ready to fill your weekend with prettiness and usefulness! ;)

Great party this week!! I think Spring is inspiring everyone to do amazing things, I seriously had a tough time choosing this week. I think I say that every week though, haha!

Swifter
Go check out Carrie's DIY Swiffer Pads over @ Dittle Dattle!! 
I don't know about you guys, but I DREAD running out of these things because they are so expensive. But, I refuse to use a "real" mop, so where does that leave me? 
In Carrie's hands, haha! What a great idea!


What a lovely cabinet, right? It's not the cabinet that's caught my eye though... look down below. See the kitty cutout in the middle door? It's a cute and cleverly disguised cat box cabinet over @ Sugar & Spice in the land of Balls & Sticks. If you've ever had cats in your house you know "the box" is the worst part. Awesome idea for making something yucky disappear! {and looking cute while doing it!}


These are so cute! I just love all the extra "bling" on each one, and they're so colorful too! 
These were made by Kailee, the newest daughter member of an awesomely cute and fun 
mother-daughter blog team. {there's three of them!} How fun is that? 
I am really looking forward to seeing what else Kailee makes for us! 


What else says summer like the beach? Maybe this Beachy Felt Wreath over @ Blissful Meandering! 
I love it! Of course, you know my and my complete inability for rosettes, I could never make this. 
But it is oh-so-lovely!!


This is a recipe for Lavender Sleepy Oil @ Musings of a Glamourpuss, and can I just say I would totally jump into a vat of this stuff if given the chance!! And, it goes GREAT with my Mommy Mask! She's even posted alternate recipes for body scrub as well as this cute printable label in case you want to make some to give as gifts. Mmmmmm!

And last but not least... the YUM factor for this week:
Check out this totally AMAZING Ocean Cake over @ The Starter Home
Is that not the most beautiful thing?
 Be sure to go take a look at her other photos, it's amazing from every angle! 
Her hubby requested a cake like this for his birthday... what an awesome wife!

Feel free to grab a button if you were featured!


Thanks again to EVERYONE who linked up! 
I really enjoy checking out the projects, as well as all of your blogs! 
Enjoy the rest of your weekend!!


XOXO

Tuesday, February 22, 2011

Tutorial Tuesday - Ruffled Scarf

Today's tutorial seems a little bit unseasonal to me because unfortunately, our weather is already making a hard turn towards spring. Ugh. I'm really ready to live somewhere where there are actual seasons, as opposed to about 3 weeks of winter and the other 11 months consisting entirely of the unrelenting heat of hell itself. Ok, so I'm being a little dramatic. But I'm a sweater chick- and even more so a scarf chick!

Aaand segway into our tutorial for this week... ;)

The Crocheted Ruffle Scarf!!

{please excuse my terrible terrible self portrait pic... hubby was out of town and I was having a tough time... 
However, be sure I have been on the hunt for a dress form since this little debacle!!}

This little project is super easy if you have some time to kill and are really good a repetition... because there's lots of that! LOL Okay, first I'm going to go ahead and give you the pattern, and then I'll tell you a few specifics about what I found out as I was working.


This ruffle scarf is very simple and easy to crochet. All you need to do is make a nice long chain that is approximately the length you want the scarf to be and keep doubling the number of crochet stitches on each row of the scarf.

Skill Level: Beginner
Finished Size: 58” (137 cm) long, 5 ½” (14 cm) wide
Gauge: not really important

Materials:
Medium Weight Yarn
Crochet Hook H (5.00 mm)
Yarn Needle

{If you need help understanding the abbreviations? Check out this crochet abbreviation chart.}


Crochet Pattern: Ruffle Scarf

Row 1: ch 203, tr in third ch from hook, tr in each row ch across
Row 2 – 4: ch 3, turn, 2 tr in each tr across
Row 5: ch 1, turn, sc in each tr across, finish off

{For a thinner scarf, simply make fewer rows that indicated in the pattern.}

I used a cream bamboo blend yarn. I don't know if any of you have every tried the bamboo yarn {especially this brand} but it is sooooooo soft and luxurious! It took me almost 4 skeins of this to finish my scarf, but I did make it super long, and a wide weave.


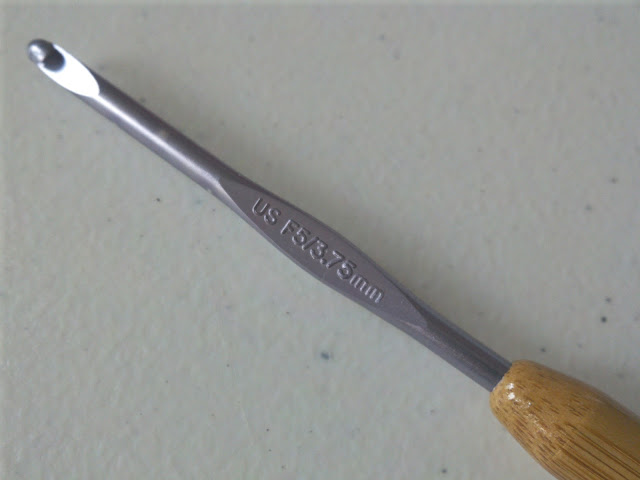
I used an F5 hook, so the loops are a decent size, but not too big to get caught on things, and not too small to be stiff and tight. I love these colored hooks with the bamboo handles {hmm, bamboo again... I'm seeing a recurring theme here, I must be on a bamboo kick!} because they are really easy to hold onto and my hand doesn't get all crampy from holding a tiny tiny metal stick. haha!


Here's a close-up of the weave, it also helps you see how the ruffle forms through the doubling of stitches by row. Doesn't it look so soft and snuggly?? I seriously want to make a blanket out of this stuff.


Finished product: pretty, pretty cascading ruffles of bamboo goodness!


I would love to see your crochet projects! This is one of my first projects since I taught myself to crochet... oh yes, I said taught myself. It's really easy, and there are tons of instructional videos on YouTube, so don't be afraid- jump right in!! This is a perfect starter project!! I actually have 3 other ones in the works now. :)

Okay! Don't forget to link up your projects for this week below!!

XOXO

I'm linking up here this week:


Related Posts Plugin for WordPress, Blogger...