Tuesday, September 27, 2011

Tutorial Tuesday & Linky Party - DIY Maxi Dress

Good morning, bloggers! I have a really awesome tutorial to share with you today. I know you're going to be shocked, but it's not something baby-related! It's a full grown sewing project, it's super fast, WAY cheap, and easy enough for anyone to do.

The DIY Maxi Dress


Now, I don't know about you guys but I have had the hardest time letting of my maternity tank tops. I love them. For me, it's comfort and coverage. Being rather, how should I say this... "top heavy" I have always struggled to find tops that can accommodate the load, lol, and offer me some decent coverage without showing my bra straps. Until I got pregnant, I just assumed I would never find this magic tank. Then came the world of maternity clothing. I can't really wear any of it anymore as it all looks funny, but I just couldn't let go of the tanks. So I decided to modify! :)

What makes this project so easy is the fact that you're using an already constructed shirt. No arm holes to sew, no serious measurements, and no trying to pin while wearing. Nice. :)

Materials List
  1. Tank top or t-shirt that fits you well. 
  2. 1 full yard (at least) of coordinating fabric. I used a jersey knit so it's stretchy and forgiving. ;)
    • A note on the skirt fabric: I used an entire yard because I planned to ruffle it to give the dress some fullness and movement, and not have it be too fitted. You can use more or less as you like, and as measurements allow. 
  3. Coordinating thread. Though it can really be any color because it doesn't show.
  4. The usual suspects: sewing machine, scissors, measuring tape
Here we go... Photos reflect instructions from left to right and top to bottom.


Tutorial Instructions:
  1. Choose your shirt and fabric.
  2. Try on your shirt and make a mark where you want your skirt to start. Then draw a guide line across the shirt and cut through, removing the bottom half.
  3. Since we're using the entire yard, fold the long sides of your fabric together and hem together to make a giant tube. I used a regular running stitch twice, and then serged the ends together for extra sturdiness. You can also use a zig-zag stitch in place of serging.
  4. Next, decide which end of the tube will be your at your waist, and sew a single line all the way around, being careful not to overlap at the seam. Pull the ends of the thread to ruffle until it fits your waist measurement.
  5. Now, turn your tube inside out (if it's not already), and put your tank inside the tube with the right sides facing each other and the open ends matched up. Pin together securely.
  6. Sew together the tank and fabric tube. You can probably use just about any stitch for this, but I used my #9 which is like a slanted zig-zag stitch. This stitch will give you a little stretch, which is good when dealing with knits and jersey fabric.
  7. You can see the finished #9 hem in box #7. Now trim your threads, and any errant fabric.
  8. Turn right side out and inspect your hems.
  9. You can hang and measure for a bottom hem, but it's not necessary. I didn't because for one, jersey doesn't fray so it doesn't need a hem, and secondly, I have such long legs that my whole yard was just about the right length to hit my toes. When it comes to dresses, I like 'em long and swishy!
And that's it! You're finished! How easy was that? Now have fun dressing it up, or wearing it plain... there's nothing this fun maxi dress can't do. 

Now it's your turn! Link up your projects below for this week's linky party!

Linky Guidelines:
  1. Please feel free to link up as many projects as you would like!
  2. Please link directly to your project post, it makes them much easier for everyone to find.
  3. Please no etsy shops, or generic blog links. Specific posts links only.
  4. Visit someone else's link and share the bloggy love!
  5. Grab yourself a button and post it in your project post or on your blog. Optional of course, but the more we share the party, the more people see your posts! :)
  6. Have fun!!
Have a great week!!

XOXO


Monday, September 26, 2011

Merchandise Monday - Leather Diaper Clutches!

Good morning, all! I just wanted to take a moment to pop in for a Merchandise Monday post (since we haven't had one in awhile) and let you know about some things going on in my etsy shop.

First of all, due to a huge increase in demand over the past 3 months or so, I've had to do some price adjusting. However, despite these changes I am happy to announce that The Little Birdie Baby Shop is now offering FREE SHIPPING on all orders! Yay!
And even though I have been up to my ears in a huge order, I've also been adding some new stuff! The Little Birdie Baby Shop is now carrying diaper clutches!


These little cuties are the perfect solution for carrying your diaper necessities in your purse. They perfectly hold 2 or 3 diapers (depending on what size) and a small pack of wipes. There's even room for a tube of diaper cream, and a pocket for your other extras!

Each one is made from high-quality upholstery leather in various colors and prints, and then lined with bright, fun, designer fabrics. Each clutch measures 10" wide by 6" tall, with a shiny nickel button stud closure. The great thing about these babies, is that while they're great for diapers, they're also great as a wallet, or for a night out!

Stay tuned to Merchandise Monday, because next week we'll be starting up with some new giveaways!!

Have a great week!

XOXO

Tuesday, September 20, 2011

Tutorial Tuesday & Linky Party - Pretty as a Pear

Good morning bloggers!! I have a little cutesy tutorial for you today, something quick and easy that you can whip up in no time.

A Pretty Pear Pincushion


This was a little project born of necessity. The little one is now perfectly capable of reaching pretty much everything on my desk. In the aftermath of a huge pin spill, I thought it high time that I make myself a little pin cushion to keep my sharps safe and out of the way.

I found this pattern online, though I can't be sure where it came from. I am constantly downloading patterns and pulling instructions for projects, even though I already have more bookmarked than I could ever complete in my lifetime, haha!!

Anyway, here it is PLUS an extra pattern for an apple pincushion as well! With some fun and funky fabrics, you could have quite the little bushel here. ;)


Click the pattern to enlarge it in another window, then print. 
I'm not sure what the size should be, I just printed as is and went to it!

Materials list:

  1. 1, 2, or 3 different fabrics for the body of the pear or apple. You don't need much. I think I used 3 half strips of jelly roll fabric.
  2. Sewing machine or needle and thread- this can TOTALLY be done by hand!
  3. Felt for the leaves. Again, you could easily get away with using scraps.
  4. Poly-fill, sand, or rice for filling.
  5. Hot glue or fabric glue
  6. Coordinating straight pins (optional)


Tutorial Instructions:

  1. Print pattern and cut out pieces.
  2. Cut 6 of each shape (pear or apple) from your fabrics, and one or two leaves (I used felt for these).
  3. Start sewing together the body pieces by placing them right sides together and sewing along ONE EDGE only.
  4. Piece and sew them together this way until you have what looks like an inside-out pear shape.
  5. Sew the opening together (again, inside out) leaving a 1" hole for turning.
  6. Turn right side out and fill. I used rice so it would have a little weight to it, and even threw in some lavender to keep my sewing table smelling lovely.
  7. Sew up your hole and tie off.
  8. You can either hot glue the leaves down or use fabric glue. I'm impatient, so I went the hot glue route. Plus I love hot glue. ;)
  9. If you found some coordinating straight pins, pop those in right on top of the leaves for a little extra accent and you're done!!
See? Easy, quick, and super cute! Now it's your turn! Link up your projects and visit one another's pages as you go. We all love visitors and comments, so share the love! :)

Linky Guidelines:

  1. Please feel free to link up as many projects as you would like!
  2. Please link directly to your project post, it makes them much easier for everyone to find.
  3. Please no etsy shops, or generic blog links. Specific posts links only.
  4. Visit someone else's link and share the bloggy love!
  5. Grab yourself a button and post it in your project post or on your blog. Optional of course, but the more we share the party, the more people see your posts! :)
  6. Have fun!!

Have a great week!!


XOXO

Thursday, September 8, 2011

Caught in the Texas Wildfires... reaching out for help!

Good morning everyone, I'm just popping in to touch base and apologize for the lack of posts this week. I'll be working toward getting back on schedule for Tutorial Tuesday and What I Pinned {Wednesday} next week. I appreciate your patience and understanding in the meantime.

As many of you know I live in Texas, just north of the Houston area- and if you have been following the news you've probably heard about the wildfires ravaging our beautiful state right now.


Tens of thousands of homes have been burned to the ground, and millions of acres have been scorched. There have also been several confirmed deaths throughout the state, as well as the loss of hundreds of head of horses, cattle, and other animals. Things are not good.


{animals left defenseless against the oncoming flames}

Many have also been evacuated from their homes in an effort to save lives, but even many of these people have lost everything. When a fire takes a home, it takes everything in it. You don't realize how much irreplaceable "stuff" you have until you risk losing it all. Photos, heirlooms, mementos, toys, clothing, furniture... EVERYTHING is just gone.

{acres and acres of land scorched and still burning...}

{Plumes of smoke behind the Austin (our state capitol) skyline}

The thing about central and southeast Texas is that it is HEAVILY wooded. We've also been in an extreme drought for most of the year, so every time one of these fires sparks up it's like setting a match to a haystack, the whole thing goes up in a matter of seconds. For that reason, these fires are proving difficult to contain, and nearly impossible to squelch as they spread mercilessly throughout our state.

{photos from central Texas, Austin, Bastrop, Magnolia and Montgomery}

My husband and I are uncomfortably close to the fires in our area, but not close enough to be evacuated yet. There are about 50 large fires burning 10-15 miles west of our house, and as long as they don't move much closer we'll be okay. However, you can see the smoke in the air and the sky is hazy with soot so living smack in the middle of 300 acres of forest is not at all comforting.

{that's SMOKE in the sky there folks, not clouds... way too close for comfort}

We have been fortunate so far, but many others have not. Unlike other recent disasters (Irene, flooding, earthquakes, etc.) for some reason, we are not getting any federal funding for this disaster. I'll leave the politics out of it, but let's just say our governor does not have a great relationship with the federal government. Unfortunately, it's our people who are suffering.

So in the true spirit of Texas' neighborly hospitality, we are throwing in together to help those who have lost everything get back on their feet. My husband and his crew is working 'round the clock locally to gather clothes, food, toys, shoes, air mattresses, towels, sheets and other "basics" for those who have lost everything. If you are interested in sending whatever you have, send me an email and I'll give your our mailing address.

I have also created a ChipIn account so those of you who would like to help financially can do so. Even $1 goes a long way to helping such a desperate situation. All proceeds will be donated to the Texas Wildfire Relief Fund based out of Austin, Texas. I will be putting the ChipIn widget up in the sidebar on the right for the foreseeable future, for easy access. It is completely secure, and is protected by Paypal policies and regulations.


Please feel free to share this post as often and wherever you can. Blogger, Facebook, Twitter, wherever. We need help, and those of us who are still standing are working hard to help our neighbors out.
 
There are shelters available to those displaced from their homes, as well as hotels offering their available space for those who might need special assistance, or who have small children. There are also several ranchers offering pasture for displaced animals, or those needing to evacuate their herds. 

If you need more info, or would like a local address to send physical goods to, please email me at:

littlebirdiebaby {at} gmail {dot} com

I will be fielding emails and phone calls 24/7, so don't hesitate to get in touch.

Prayers are also VERY welcome!!!


XOXO


Wednesday, August 31, 2011

What I Pinned {Wednesday}

Hi all! I hope you're having a great week so far, it's hump-day so at least we know we're halfway to the weekend! For this week's edition of "What I Pinned {Wednesday}" I'm sharing some pins from my "Green Living" board.

Like me, I know many of you out there are always looking for ways to leave less of a mark on the earth, live more self-sustained lifestyle, and maybe save some $$ along the way. Hopefully some of these links are helpful, and as an added bonus I've added a litte linky party below where you can add any "green living" tips or links that you would like to share with me!

If you link up some of your own tips and tricks for green living, I'll catalog them and put them all together for a very special "Green Living" series coming this Fall!

Here's what I have to share this week. If you'll notice, all these links are conveniently laid out like a road map to a successful, natural garden! (click the photos for pinterest-provided links):


DIY Winter Greenhouse for about $50
{great for leafy greens, and keeping a stock of fresh veggies through the winter!}

DIY Rain Collection Barrels
{because when you're in the middle of a huge drought, regular water just doesn't cut it}


35 DIY Pest, Disease and Weed Remedies
{to keep those plants and veggies bug-free, disease-free, and healthy!}


Web Resource for How to Can ANYTHING!
{so you'll get the most out of your garden or grocery trip}


Home made substitutes for your grocery store staples.
{because less time in the grocery store is always a plus... at least for this Momma!}


Kitchen Countertop Compost Collector
{no more stinky mess, and no more trips out to the compost bin after dark when it's 40 degrees out!}


And even though it has nothing to do with your garden, this is one of my favorites:

A Comprehensive List of DIY cleaners and solutions for your home!
{because don't you feel better knowing what your family is being exposed to? I do.}


Feel free to link up any of your "Green Living" 
projects, ideas, recipes, or links below!

PLEASE, no unrelated posts, they'll just get deleted anyway. ;)


***Need an invite to Pinterest? Leave me a comment with your email and I'll send you one!***


XOXO

Tuesday, August 30, 2011

Tutorial Tuesday - The Cutest Clutch in Town!

Good morning everyone! It's time for another edition of Tutorial Tuesday, complete with linky party fun!

I did {another} sewing project this week. I hope you guys are not getting too tired of the sewing tutorials, I am really coming into my own with my machine and I'm just so excited to try all these new projects. This week I jumped even further out of my comfort zone and tacked the oh-so-scary ZIPPER!!!

I know, just thinking about it used to make me cringe. Now, not so much. I'm excited about all the new projects I can do now with my new zipper skillz. {That's right, I spelled it with a z... because that's how mad my skills are. ;)} What do you think? Introducing...

The Cutest Clutch in Town
{a.k.a. The Aviary Clutch}


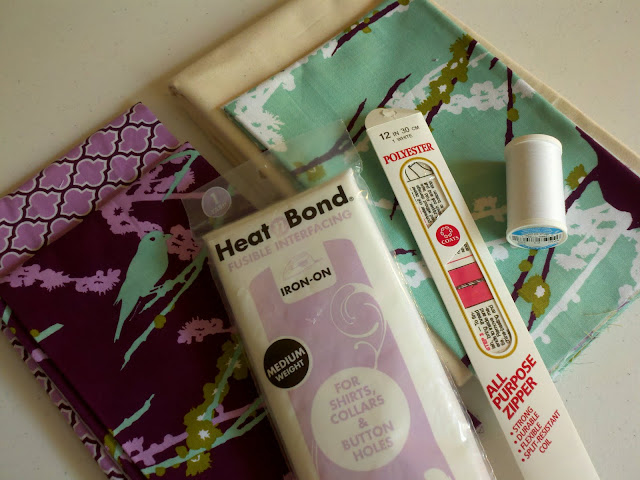
A friend and I were talking the other day when Joel Dewberry's Aviary 2 collection came up. It inspired me to pull out my little Aviary 2 stash and make myself something lovely. :) I'm a sucker for purple, and turquoise is currently holding 2nd in that poll, so this collection is right up my alley.

I found the tutorial on the Noodlehead blog, so you can pop over there to check out the details, but I made some adjustments so give you a quick rundown here, too. :)

Here's what you need:


Materials List:

1. Fabrics of choice- I used 4 different fabrics, but you can use as few as two.

  • Main front fabric: one 5.5" tall by 9" wide, and one 5.5" tall by 13" wide (the longer piece will be the gathered/ruffled front)
  • Front band: one piece 4" tall by 9" wide.
  • Lining: two pieces 5.5" tall by 9" wide
  • Zipper end covers: two pieces 1.5" tall by 2.5" wide.
  • Medium weight fusible interfacing: (2) 5.5" tall by 9" wide (for fusing to inside of exterior pieces of clutch)
{Optional Pieces}
  • Divider pocket: one piece 8" tall by 9" wide (apply interfacing to half, you'll need a 4" x 9" piece)
  • Card holders: one piece 7" tall by 9" wide (apply interfacing to half, you'll need a 3.5" x 9" piece)
  • Cash pocket: one piece 5" tall by 9" wide (apply interfacing to half, you'll need a 2.5" x9" piece)
2. Zipper. Can be longer and cut down, but finished size will need to be 8.5" long

3. Medium weight fusible Interfacing (see above for measurement details)

4. Coordinating thread

Now as far as the basic pattern goes, I followed the Noodlehead tutorial pretty much to a T. And she's got some great pics to go along with the steps too.

I took some liberties when it came to the inside. I like pockets in my wallet/purse so I had to make some.

I took the large "divider" piece (folded over and fused), and top stitched about 1/4" from the folded edge then top stitched another row 1/4" below that. Next, I basted the sides of the piece to one side of the lining.

Next, I took the 7"x9" piece folded it over and fused it together and top stitched it the same way as the first piece. I then basted the ends to the other piece of lining. 

This is where it gets personal. ;) Depending on what you're going to be using the pockets for, the measurements for the stitching will be different. I wanted to have credit card pockets, a pocket for my business cards, and a pocket to hold my chap stick so I used each of those things to help me measure off the sections.

I also added a shorter pocket in front of the larger set of pockets for stowing cash in. That's the 5"x9" piece, just fold it in half and fuse it the same way as the others and sew it on in front of your first set of pockets.

Just to make myself feel good, I also sewed in one of my tags. You know, so it's custom. ;)

Finish following the Noodlehead tutorial and you should be all set!!


Tips for this Tutorial:
  • When sewing together your lining, leave a larger seam allowance than you did when sewing together your outside pieces. (ex. 1/4" seam allowance on outside pieces, 3/4" seam allowance on lining.) This just helps the lining and pockets fit nicely into the clutch without bunching up.
  • If I were doing this project again, I would make the front ruffled part 5.5" x 15" instead of 13" so I could have better ruffles. Who doesn't like more ruffles? ;)
  • Mix up your fabrics for a truly unique piece!


So now it's your turn! 
Link up your projects below, and grab a button for your project post. 
Be sure to visit other links on the list and share the love! :)
Today's Creative Blog

Have a great week!!
XOXO


Monday, August 29, 2011

Merchandise Monday - Updates to The Little Birdie Shop!

Good moring (er, uh... afternoon) everyone! I just wanted to pop in really quick and update you guys on some new additions to The Little Birdie Shop on Etsy. I've been hard at work getting some of my show merchandise photographed and posted, as well as some items that are brand new to the shop!

There are a few new onesie designs:


And some fun new little baby shower gift sets... some with "Little Birdies" and some with our old friend, "Eli the Elephant" :)


I'm working on getting my little cutie booties listed as well, as I have had MUCH response from last time's Tutorial Tuesday post.

I hope you'll stop by and check out all the new stuff, and I would LOVE to hear your feedback!! :)

Tomorrow I've got a fresh new tutorial for a super fun sewing project, so don't miss out! Have a great Monday, and be sure to check out the linky party tab up top for some of my favorite linky parties happening out in blog land today. Until then, keep creating!


XOXO

Thursday, August 25, 2011

A banner day for The Little Birdie!

So, obviously I was excited about my little feature on Sugar Bee this morning, but it doesn't stop there! I came back to the computer after putting Baby A down for her morning nap and I had the sweetest message from Stephanie at My Lil Pumpkin Patch letting me know she had given me "The Versatile Blogger" award. I feel so loved today!!


Stephanie is a recent addition to our bloggy bud friends, and I'm so excited that she's enjoying The Little Birdie so much. You are so sweet, Steph! Now it's my turn to share this award with some of my new favorites!

There are also some fun "play along" parts to getting this award:

1. Thank the person who gives you this award and link back to their blog.
2. Share 7 things about yourself in your post.
3. Pass this award on to 10 blogs you have recently fallen in love with and include links in your post.

Thanks again Stephanie! All of you should take a sec to pop over to Steph's blog, My Lil Pumpkin Patch to show her some love and check it out. It's super cute!

Here are some things about me that you may not know:

1. I have a few weird and irrational fears, e.g. raccoons clawing through the screens while the windows are open, the ceiling fan falling out of the ceiling and chopping my legs off while I sleep, the hair monster in the shower drain. I know, I know. I said they were irrational, haha!

2. I have an ANCIENT kitty cat that I've had since I was 12 years old. He must be like 200 in cat years by now.

3. I am the definition of "a creature of habit." Routines keep me sane, and keep me on track. Maybe that makes me a little bit OCD, but whatevs. Girl's gotta do what a girl's gotta do. ;)

4. My kiddo is nearly 15 months old and I'm still taking my prenatal vitamins. I kinda thought that it must be a good habit, and any vitamin is better than no vitamin, right? (remember what I said about routines? LOL!)

5. Hubby and I find it immeasurably hilarious to do "voice over commentary" for our little Jack Russell, Tina. She's so cute and silly all the time so the hilarity is already there, plus I have a "Tina voice" that just comes naturally so it just makes good sense.

6. I have pinned and bookmarked more projects, recipes, and design ideas than I could ever do in 5 lifetimes, and yet I still keep at it.

7. I absolutely love getting mail, but since "becoming an adult" I have found that mail really isn't all that great. It's mostly bills, solicitations, and crappy grocery mailers. One of my favorite things about The Little Birdie is how much real, actual mail it has brought into my life. I love getting notes from etsy buyers, test product from new vendors, pretty fabrics from new designers, and anything and everything else that people send me!

Finally, here are some blogs that I've recently come across that you should definitely check out!


I hope you all take a minute to visit these great blogs, and have a great day!!


XOXO


Feature on Sugar Bee Craft Edition!

I woke up this morning, and in my usual 7am haze started catching up on all my favorite blogs and linky parties. Lo and behold, what did I find? Myself! Well, my little "Betty Page" Pinup Baby Booties from last week! I feel so special. :)

Every Thursday, Mandy at Sugar Bee Crafts does a "show-off," hosted by one of her favorite bloggers and this week, my little baby booties were lucky enough to be included. :)

Sugar Bee Crafts: sewing, recipes, crafts, photo tips, and more!

I am a huge fan of Sugar Bee Crafts, and if you haven't been to check out Mandy's awesome blog... DO! She is so super crafty, and seriously one of the nicest people ever.

So, shout out today to Mandy at Sugar Bee Crafts and Christy at Christy's Cuties for the sweet mention. It made my morning! :)

XOXO


Tuesday, August 16, 2011

Tutorial Tuesday - Cutie Booties!

Hey everyone! Welcome to Tuesday! I am really excited to show you what I've been working on lately. I've been on a roll making baby shoes. :)

It was a pretty big leap for me, but I'm glad I did it. I feel more confident about my sewing and less afraid to try something new/harder. As much as I would love to share this pattern with you, I purchased it from a fellow etsy seller as a "one per person" thing. BUT, I am at work on my own pattern so that I can share it with you and start popping these bad boys into my shop.

Here are the girly ones I did:


And I couldn't forget the boys...


What do you think? I'm pretty proud of myself and looking for some babies to dress now, haha! :)

Now it's your turn to share!

Link up below and let's see what you all have been up to...


XOXO


Related Posts Plugin for WordPress, Blogger...